Step-by-Step Guide: How to Install a Vapor Barrier in a Crawl Space
Spencer Turner • July 17, 2023

Are you considering installing a vapor barrier in your crawl space but unsure where to start? Look no further! In this step-by-step guide, we will walk you through the process of installing a vapor barrier, providing you with the knowledge and confidence to tackle the project yourself. From preparing the crawl space to securing and sealing the barrier, follow our detailed instructions to create a moisture-resistant barrier that helps protect your home from unwanted moisture and potential damage.


A Detailed Walkthrough

Installing a vapor barrier in your crawl space is an important step in moisture control and protecting your home. With our detailed walkthrough, you can confidently tackle this project and create a more resilient crawl space environment. 


Our step-by-step guide begins with proper preparation, including clearing the area and addressing any existing moisture or mold issues. We then guide you through measuring and cutting the vapor barrier to fit your crawl space dimensions accurately. You'll learn how to secure the barrier to the walls and floor, ensuring a tight and effective seal. Additionally, we provide tips on sealing seams, anchoring the barrier, and properly venting any potential radon gas. Our walkthrough covers the entire process, empowering you to take control of your crawl space moisture and enhance the overall health and durability of your home.


By following our detailed walkthrough, you can save on professional installation costs while achieving a high-quality vapor barrier installation. Remember to consult local building codes and regulations, use appropriate safety measures, and reach out to professionals if you encounter any challenges. With our guidance, you can successfully install a vapor barrier in your crawl space, creating a barrier against moisture infiltration and safeguarding your home for years to come.

Say Goodbye to Moisture Issues

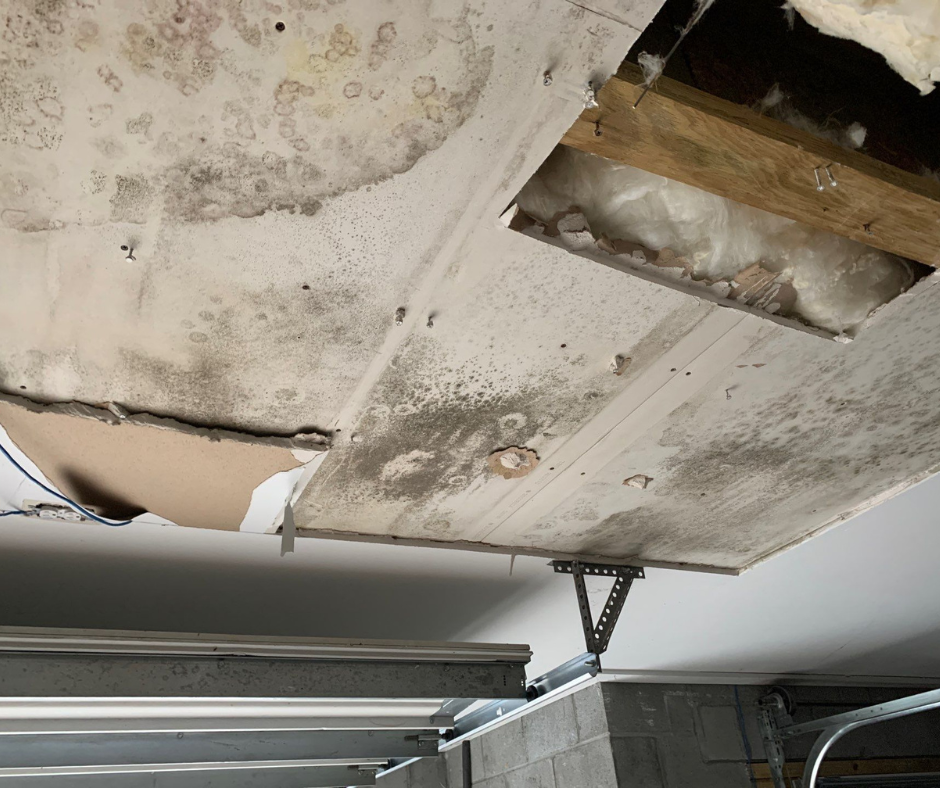
Dealing with moisture issues in your home can be a frustrating and potentially damaging experience. From mold growth to structural damage, excess moisture can wreak havoc on your living space. However, with the right measures in place, such as installing a vapor barrier in your crawl space, you can say goodbye to these moisture issues once and for all.


A properly installed vapor barrier acts as a shield, preventing moisture from infiltrating your crawl space and seeping into your home. By creating a barrier between the ground and your living space, the vapor barrier helps control humidity levels and reduces the risk of mold growth and other moisture-related problems. Additionally, it can help minimize the potential for wood rot, insulation damage, and odors caused by damp conditions. With a well-installed vapor barrier, you can create a healthier, drier, and more comfortable living environment.


Say farewell to the worries and inconveniences of moisture issues by installing a vapor barrier in your crawl space. Enjoy the peace of mind that comes with knowing your home is protected from moisture-related problems. With this simple yet effective solution, you can bid adieu to excess humidity, mold growth, and structural damage, and welcome a drier and healthier home for you and your loved ones.

Efficient and Effective

When it comes to addressing moisture issues, efficiency and effectiveness are key. Installing a vapor barrier in your crawl space offers a solution that is both efficient and effective in combating excess moisture. 


The efficiency of a vapor barrier lies in its ability to create a barrier between the ground and your living space, preventing moisture from infiltrating and causing damage. By sealing off the crawl space, the vapor barrier helps control humidity levels, reducing the risk of mold growth, wood rot, and other moisture-related problems. It acts as a proactive measure, efficiently keeping moisture at bay and protecting your home from potential damage.


Not only is a vapor barrier efficient, but it is also highly effective in moisture control. By installing a vapor barrier, you create a physical barrier that prevents moisture from seeping into your crawl space and home. It acts as a defense mechanism, safeguarding your property and creating a healthier living environment. With its ability to reduce moisture-related issues, a vapor barrier provides an effective long-term solution that can save you time, effort, and potential repair costs.


In conclusion, installing a vapor barrier in your crawl space is an efficient and effective way to address moisture issues. It efficiently creates a barrier to control humidity and prevent moisture infiltration, while its effectiveness lies in its ability to protect your home from mold, rot, and other moisture-related problems. By investing in a vapor barrier, you can enjoy the peace of mind that comes with a drier, healthier, and more resilient living space.

FAQs

  • What materials do I need to install a vapor barrier in my crawl space?

    To install a vapor barrier in your crawl space, you will need materials such as a high-quality vapor barrier (typically made of polyethylene), a utility knife or scissors for cutting the barrier, a tape measure, a staple gun or adhesive for securing the barrier, and sealant for sealing seams and edges.

  • How do I prepare my crawl space before installing the vapor barrier?

    Before installing the vapor barrier, it is important to properly prepare the crawl space. This includes clearing out any debris or objects, addressing existing moisture or mold issues, and ensuring the crawl space is clean and dry. It may also involve repairing any structural or plumbing issues that could contribute to moisture problems.

  • How do I measure and cut the vapor barrier to fit my crawl space dimensions?

    Measuring and cutting the vapor barrier accurately is crucial for a proper installation. Start by measuring the dimensions of your crawl space, including the length, width, and height of the walls and floor. Using those measurements, cut the vapor barrier into sections that will fit each area, leaving some extra material for overlapping and sealing.

  • How do I secure the vapor barrier to the walls and floor of the crawl space?

    Securing the vapor barrier involves attaching it to the walls and floor of the crawl space. This can be done using a staple gun to staple the barrier to wooden surfaces or using an adhesive appropriate for the material of your crawl space. Ensure a tight fit and properly seal any seams or edges to prevent moisture from bypassing the barrier.

  • Are there any additional steps or considerations for a successful vapor barrier installation?

    In addition to the basic steps, there are a few additional considerations for a successful vapor barrier installation. These include properly anchoring the barrier to prevent shifting, providing ventilation for potential radon gas, and periodically inspecting the vapor barrier for any damage or wear. It is also important to check local building codes and regulations to ensure compliance during the installation process.

Contact EAS Environmental Today!

EAS Environmental will do everything we can to ensure your experience with us is excellent.

CALL US NOW

Request A FREE Estimate

Request a Free Estimate Form

Checkout Recent Post

By Spencer Turner July 10, 2025
Asbestos was once hailed as a “miracle material” for its heat resistance, durability, and insulating capabilities. For decades, it was widely used in residential construction—especially in insulation, floor tiles, roofing materials, and textured ceilings. However, growing awareness of its severe health risks prompted a series of regulatory crackdowns. So, when was asbestos banned in homes? The answer isn’t straightforward—but knowing the history is essential for homeowners, renovators, and anyone living in a home built before 1990. Asbestos Use in Residential Construction: A Historical Overview Asbestos use in homes peaked between the 1930s and the 1970s. It was commonly found in: Insulation (especially around pipes and ducts) Vinyl (VCT) floor tiles and adhesives (mastic) Roofing shingles and flashing Cement siding (“transite”) Acoustic ceiling tiles Popcorn ceiling texture Joint compounds - like those found in typical drywall Cement products Although concerns about asbestos exposure surfaced as early as the 1960s, it wasn't until the late 1970s and 1980s that its use began to be seriously curtailed - but not eliminated. When Was Asbestos Banned? Contrary to popular belief, asbestos has not been fully banned in the United States. Instead, its use has been heavily restricted through a series of phased regulations: 1973: The EPA banned spray-applied asbestos-containing materials for fireproofing and insulation. 1977: The Consumer Product Safety Commission banned asbestos in wall patching compounds and artificial fireplace embers. 1989: The EPA issued a full ban under the Asbestos Ban and Phase-Out Rule—but it was largely overturned in 1991. Present Day: Many asbestos-containing materials are no longer manufactured or sold, but asbestos remains legal in certain products under strict regulation. Because of this phased and partial ban, asbestos-containing materials can still be found in homes built as late as the 1980s—and even later in some imported materials. How Do I Know If My Home Contains Asbestos? If your home was built before the mid-1980s, there's a high chance it may contain asbestos. However, asbestos is not dangerous unless it is disturbed and becomes airborne. Common risk scenarios include: Renovation or demolition of older homes Damage to aging building material DIY repairs involving insulation or flooring Professional asbestos inspection and testing are the only reliable ways to confirm its presence. Where Can Asbestos Still Be Found in Homes? Even homes built into the 1980s or early 1990s may contain asbestos. It’s often present in: Popcorn/textured ceilings Vinyl tiles and mastic adhesives Duct and pipe insulation Roofing and siding materials Joint compound used in drywall taping What EAS Environmental Can Do to Help At EAS Environmental, our certified professionals specialize in: Asbestos inspections and risk assessments Sample collection and laboratory testing Safe asbestos abatement and removal Post-removal air quality verification We adhere strictly to federal and state guidelines, ensuring that any asbestos-containing materials are handled safely and effectively. Don’t Take the Risk—Test Before You Renovate Whether you’re planning a renovation or simply want peace of mind, understanding your home's asbestos risk is crucial. Ignoring potential exposure can lead to serious health issues like mesothelioma, lung cancer, and asbestosis. Contact EAS Environmental today to schedule a professional inspection and safeguard your property and your health. FAQ – Common Asbestos Questions Q: Is asbestos still used today? A: Yes. Some imported products may legally contain asbestos (e.g., brake pads, roofing, gaskets). Q: Can I test for asbestos myself? A: DIY kits are available but unreliable. Disturbing the material could create a health risk. It is best to consult with a certified professional. Q: What’s the safest way to remove asbestos? A: Consult with licensed abatement specialists who follow EPA and OSHA standards. Q. Can I find asbestos on new homes? A: Yes. Some newer homes may still contain asbestos in imported materials, leftover stock, or legal non-friable products like certain floor tiles or roofing materials. References 1. U.S. Environmental Protection Agency (EPA) Asbestos Laws and Regulations: https://www.epa.gov/asbestos/asbestos-laws-and-regulations 2. Occupational Safety and Health Administration (OSHA) Asbestos Fact Sheet: https://www.osha.gov/sites/default/files/publications/OSHA3507.pdf 3. Consumer Product Safety Commission (CPSC) Banned Hazardous Products: https://www.cpsc.gov/Business--Manufacturing/Business-Education/Business-Guidance/Banned-Hazardous-Products 4. Agency for Toxic Substances and Disease Registry (ATSDR) Asbestos Toxicological Profile: https://wwwn.cdc.gov/TSP/ToxProfiles/ToxProfiles.aspx?id=30&tid=4 5. National Cancer Institute (NCI) – NIH Asbestos Exposure and Cancer Risk: https://www.cancer.gov/about-cancer/causes-prevention/risk/substances/asbestos/asbestos-fact-sheet 6. Environmental Working Group (EWG) Asbestos Nation Report: https://www.ewg.org/asbestos/
By Spencer Turner June 26, 2025
In the restoration industry, your name is everything. Reputation, reliability, and results drive your success — and that’s exactly why restoration companies across South Carolina choose EAS Environmental as their trusted subcontractor. We understand the pressure restoration firms face: tight timelines, unpredictable scopes, complex compliance standards, and demanding client expectations. When you need a partner who enhances — not hinders — EAS delivers quietly, powerfully, and professionally.
By Spencer Turner April 8, 2025
The EAS Environmental Team Our core values are fundamental to our operation and integral to our identity at EAS Environmental (EASE). These principles guide our actions, influence our decisions, shape our culture, and ensure that we consistently deliver outstanding services while maintaining a supportive and dynamic work environment. As we gathered insights from our employees about how these values play out in their work lives, it became evident how integral they are to both our individual and collective successes.
By Spencer Turner March 5, 2025
Mold: it’s more than just an unsightly blotch on your walls—it’s a sneaky intruder that can compromise your health and home integrity before you even realize it’s there. At EAS Environmental, we deal with this hidden hazard head-on, combining expertise and empathy to restore safety and comfort to your spaces. Today, we'll dive into the nitty-gritty of mold—what it is, where it lurks, and why it’s a problem—plus, we'll share how our team ensures your environment remains healthy and wholesome.
SEE MORE

Got a Question? We’re Here to Help.

You can arrange an appointment or make an enquiry by phone or email, orget in touch to us via our contact form.

CONTACT US TODAY