Installing a Dehumidifier in Crawl Space: Step-by-Step Guide
Spencer Turner • October 20, 2023

In this series, we'll walk you through the essential process of installing a dehumidifier in your crawl space, a vital step towards moisture control and maintaining a healthy living environment. From preparation and placement to electrical connections and drainage considerations, join us as we provide detailed insights and expert advice on every aspect of successfully installing a dehumidifier in your crawl space.


Gather Your Tools and Materials for Crawl Space Dehumidifier Installation

Before embarking on the installation of a dehumidifier in your crawl space, it's crucial to gather all the necessary tools and materials to ensure a smooth and efficient process. Start by assembling basic hand tools such as a screwdriver, pliers, and wrenches, which will be essential for securing the unit and making any necessary adjustments. Additionally, have a drill and appropriate drill bits on hand for creating holes if needed, along with a level to ensure the dehumidifier is properly aligned.


In addition to tools, gather the materials required for installation. This includes any mounting brackets or hardware provided with the dehumidifier, as well as the appropriate screws, anchors, and fasteners for securing the unit to the crawl space walls or floor. Depending on the drainage system you choose, you'll need hoses or pipes for directing collected water to a suitable drainage point. By carefully organizing and having all the tools and materials at the ready, you'll streamline the installation process and ensure a successful placement of your crawl space dehumidifier.

Inspecting Your Crawl Space: Preparing for Dehumidifier Installation

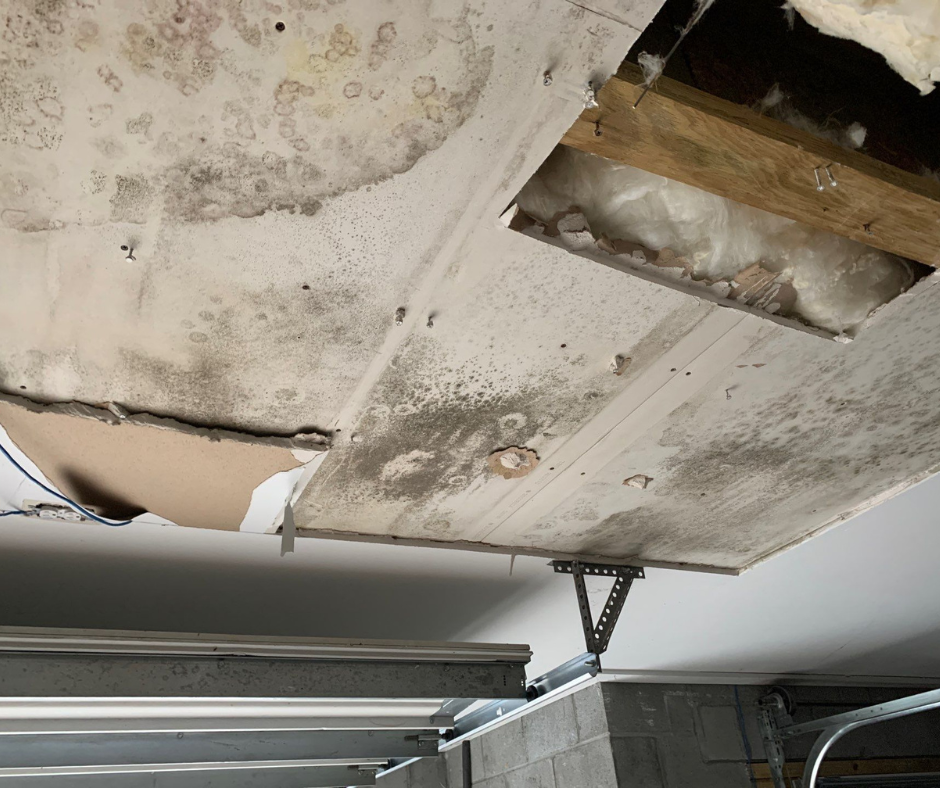
Before diving into the installation of your crawl space dehumidifier, it's essential to conduct a thorough inspection of the crawl space area. Start by assessing the overall condition of the space, looking for any signs of existing water damage, mold growth, or structural issues. Addressing these concerns before installing the dehumidifier ensures that you're starting with a clean and stable environment.


Next, evaluate the layout of the crawl space to determine the optimal placement for the dehumidifier. Consider factors like accessibility, available electrical outlets, and the potential proximity to drainage points. Clear any obstacles that might hinder the installation process and ensure that the area is well-ventilated. By carefully inspecting and preparing your crawl space, you set the stage for a successful dehumidifier installation that effectively manages moisture and contributes to a healthier living environment.

Choosing the Right Dehumidifier for Your Crawl Space: Size and Capacity

Selecting the right dehumidifier size and capacity for your crawl space is a crucial step in ensuring effective moisture control. To determine the appropriate size, consider the square footage of your crawl space. Dehumidifiers are rated based on the amount of moisture they can remove in a given time, usually measured in pints per day. As a general guideline, a small crawl space (around 1,000 square feet) might require a dehumidifier with a capacity of 30 to 40 pints per day, while larger spaces may need units with capacities ranging from 50 to 70 pints per day.


Equally important is choosing a dehumidifier that matches the humidity levels in your crawl space and the climate in your region. If your crawl space experiences consistently high humidity, you might need a more powerful unit. In contrast, milder climates might require a less robust dehumidifier. By accurately assessing your crawl space's size, humidity levels, and environmental conditions, you'll be better equipped to select a dehumidifier with the appropriate size and capacity, ensuring efficient moisture management and a healthier living environment.

FAQs

  • Do I really need to install a dehumidifier in my crawl space?

    Installing a dehumidifier in your crawl space is highly recommended, especially if you're dealing with excess moisture, mold growth, or dampness issues. It helps prevent structural damage, mold-related health problems, and improves the overall air quality within your home.

  • Can I install a dehumidifier in my crawl space myself?

    While some homeowners may have the skills to install a dehumidifier themselves, it's advisable to consult professionals, especially if you're unfamiliar with electrical connections, drainage systems, or crawl space conditions. Professional installation ensures that the unit is set up correctly and efficiently.

  • How do I determine the right size of dehumidifier for my crawl space?

    The size of the dehumidifier depends on your crawl space's square footage, humidity levels, and environmental conditions. You'll need to calculate the pints per day capacity based on these factors. Manufacturers often provide sizing guidelines to help you make an informed decision.

  • What features should I look for when choosing a crawl space dehumidifier with pump?

    Proper placement is essential to evenly distribute dry air throughout the crawl space. Central placement ensures efficient moisture removal from all corners, preventing pockets of dampness. It's also crucial to position the dehumidifier away from potential water sources and in an easily accessible location for maintenance.

  • How often should I maintain my crawl space dehumidifier?

    Regular maintenance is crucial for optimal performance. This includes cleaning the filter, inspecting the drainage system for blockages, and checking electrical connections periodically. Refer to the manufacturer's guidelines for recommended maintenance intervals to ensure your dehumidifier operates effectively.

Telephone receiver with a speech bubble containing three dots.

Contact EAS Environmental Today!

EAS Environmental will do everything we can to ensure your experience with us is excellent.

CALL US NOW

Request A FREE Estimate

Request a Free Estimate Form

Checkout Recent Post

By Spencer Turner January 23, 2026
When people hear the word “asbestos,” it can feel intimidating—and for good reason. Asbestos-Containing Materials (ACMs) must be handled carefully, even when they’re considered non-friable. The key is experience, preparation, and strict control throughout the entire process. At EAS Environmental, we provide asbestos abatement services throughout both South Carolina and Georgia. We use the information we are given by the Client to come up with a stellar Scope of Work including engineering controls, removal/abatement protocols, and disposal methods. Our goal is to help you understand how professional abatement is planned, executed, and verified, so that you can make the right decision when deciding who to hire as an abatement contractor. Abstract: EAS Environmental completed a Class II, non-friable Category II asbestos abatement project at a commercial facility in Savannah, GA, involving the controlled removal of asbestos-containing Transite wall panels. In this case study, we will outline the process of how our team prepared the regulated area, used engineering controls like containment barriers and HEPA filtration, the methods we used in order to remove panels while intact, packaged waste correctly for disposal, and followed documentation and inspection procedures to ensure a safe, compliant close-out. This article emphasizes the importance of the amount of care that these types of abatement projects require.
By Spencer Turner December 2, 2025
In today’s world, we believe that true success comes from more than just business growth — it’s about giving back and making a real difference where we live and work. At EAS Environmental LLC, we’re proud to be a full-service disaster restoration and environmental remediation company based in the Charleston, South Carolina region. While our work focuses on restoration, abatement, and remediation, our mission goes far beyond that. Every project we take on is driven by a deeper purpose: to help build safer, healthier environments for our neighbors, especially those most vulnerable to environmental risks. Below we’ll explore how EAS Environmental is making a difference — and then identify five key pillars of corporate responsibility in action.
By Spencer Turner October 27, 2025
Restoration work can feel overwhelming—especially when you’re staring down the aftermath of a flood, fire, or hazardous material exposure. At EAS Environmental, we believe that transparency and trust are key. That’s why we’re pulling back the curtain on what a real restoration project looks like when you work with our team—from the first call to the final walkthrough. Our goal is to help you understand every step of the process, so you know exactly what’s happening and why. With decades of experience and a commitment to safety, we make sure your property is restored the right way—the first time. By the end, you’ll not only have a clean, safe space again but also the peace of mind that comes from knowing it was done properly. Abstract: A grease fire broke out in the kitchen of a Florence apartment, spreading smoke and soot to the walls, ceilings, and floors throughout the second-story residence. Just your typical fire mitigation job, right? Wrong; after some third-party sampling and laboratory analysis, Asbestos-Containing Materials (ACMs) were identified in the apartment. In this case study, we walk through how our company, EAS Environmental, handled the turn-key process of the asbestos abatement, and then rebuilding the property to its pre-loss condition. From navigating complex environmental regulations to coordinating restoration timelines, this project showcased the importance of expertise, communication, and precision in every phase. This article highlights how our team transformed an unexpected challenge into a seamless, compliant, and fully restored living space. The Situation: Fire Damages Disturb Asbestos Containing Materials The tenant accidentally started a grease fire in the kitchen of their second-story Florence apartment. The good news: no one was seriously injured. The bad news: the fire left behind significant damage – smoke and soot coating every surface in every room. Fire mitigation projects happen every day, but not all of them come with an unexpected condition lurking beneath the layers of soot and smoke.
By Spencer Turner September 15, 2025
It doesn’t take a massive fire to cause a lot of damage. In fact, even a small electrical fire can fill your entire home with thick smoke, leaving behind soot on surfaces and that stubborn burnt smell that just won’t go away. That’s exactly what happened in one home we recently worked on—and it’s a great example of how EAS Environmental steps in quickly with expert fire damage mitigation and structural cleaning services to make things right again
SEE MORE

Got a Question? We’re Here to Help.

You can arrange an appointment or make an enquiry by phone or email, orget in touch to us via our contact form.

CONTACT US TODAY