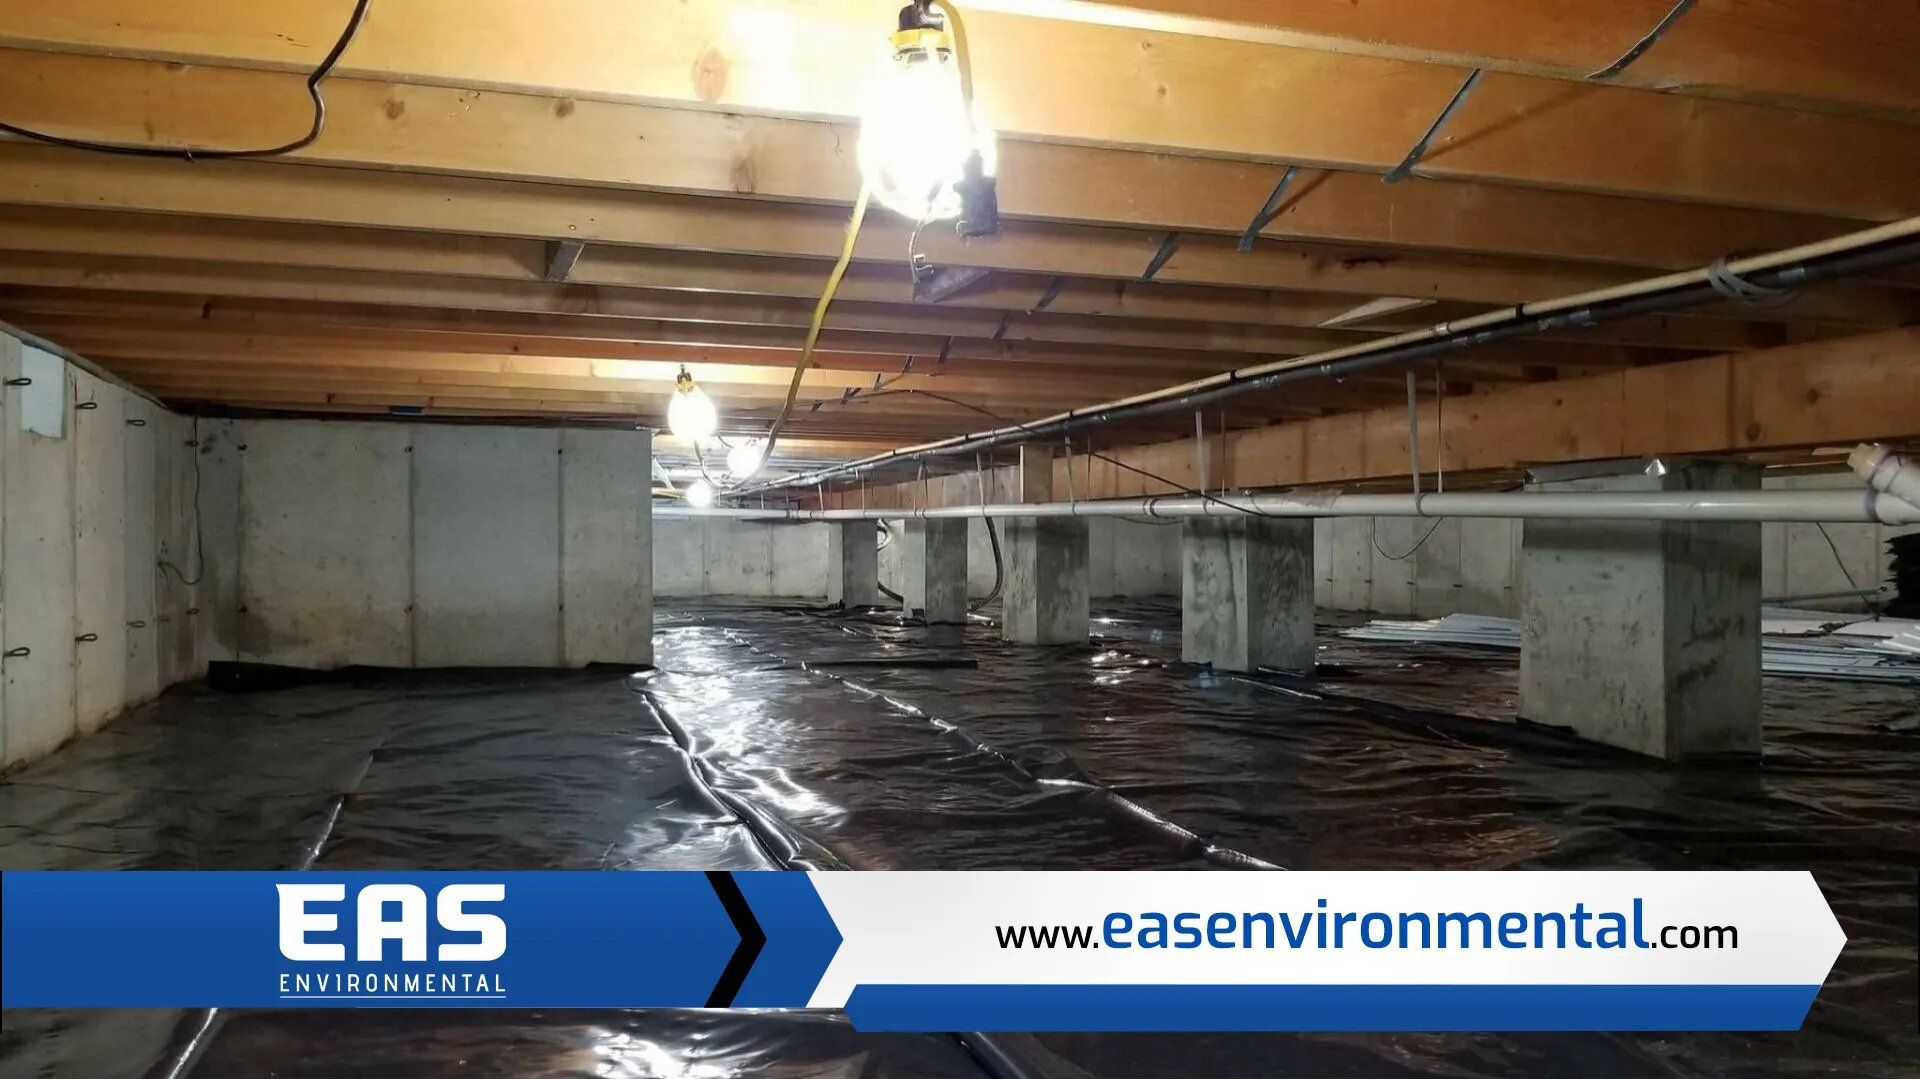
If you live in North Charleston, South Carolina, you may already be aware of how crucial it is to have a properly sealed crawl space to keep moisture and humidity out of your house. As it aids in preventing the transfer of water vapor through the walls and floor of the crawl space, a crawl space vapor barrier is an essential component of this sealing procedure.
To provide your property with the best level of safety and energy efficiency, the vapor barrier must be installed correctly. The actions you may take to assure effective crawl space vapor barrier installation in North Charleston, South Carolina, will be covered in this blog.
Overview of Vapor Barrier Installation
A layer of material known as a vapor barrier is used to stop moisture and water vapor from permeating walls, floors, and ceilings. A vapor barrier in the context of crawl space installation is normally constructed of a thick plastic sheet that is positioned on the crawl space's ground surface. The vapor barrier's main function is to stop moisture and water vapor from rising into the crawl space and perhaps infiltrating the home's living area.
Preparing the crawl space surface, laying out the vapor barrier material, and fastening the material's edges to the crawl space walls are all necessary processes in the installation of a vapor barrier in a crawl space. As gaps and holes can let moisture and water vapor through, it is crucial to make sure the vapor barrier is correctly sealed and overlapped to avoid any.
It is advised to employ a qualified contractor to manage the installation of a crawl space vapor barrier because it can be a difficult and drawn-out process. A qualified contractor will have the equipment and tools required to install the vapor barrier appropriately, as well as the knowledge and experience to guarantee a job well done.
4 Benefits of Vapor Barrier Installation
Installing a crawl space vapor barrier in your North Charleston, South Carolina house has a number of advantages. These advantages include:
Improved Energy Efficiency
By preventing moisture and water vapor from entering the crawl space and potentially the living area of the home, a properly placed vapor barrier can help to increase the energy efficiency of your home. Lower energy expenses may result from a reduction in the energy used to heat and cool your home.
Increased Comfort
Living in a sealed and vapor barrier-protected crawl area will be more pleasant because it won't have any extra moisture or humidity. This can assist in lowering the danger of allergies and other respiratory conditions, as well as the risk of mold and mildew growth.
Enhanced Structural Integrity
Excessive moisture and humidity can cause structural damage to a crawl space over time. By keeping moisture and water vapor from entering the crawl area, a vapor barrier can help to safeguard the structural integrity of your home.
Improved Indoor Air Quality
A vapor barrier can aid in enhancing the indoor air quality of your home by preventing moisture and water vapor from entering the crawl area. By lowering the chance of mold and mildew formation, you and your family's respiratory health may be enhanced.
Materials Needed for Vapor Barrier Installation
In order to correctly construct a crawl space vapor barrier in your North Charleston, South Carolina house, you will require a number of supplies, including:
- Vapor barrier material: The most crucial component for installing a vapor barrier is this. Typically, a thick plastic sheet that is impervious to moisture and water vapor serves as the vapor barrier material. Vapor barrier materials come in a variety of forms, including reinforced polyethylene, polypropylene, and polyethylene.
- Crawl space sealant: The edges of the vapor barrier material are sealed to the crawl space walls using crawl space sealant. In order to prevent moisture and water vapor from passing through the vapor barrier, this helps to guarantee that the barrier is free of any gaps or holes.
- Crawl space tape: Vapor barrier material is joined together using crawl space tape, which is also used to seal any seams.
- Crawl space encapsulation system: A comprehensive vapor barrier system called a crawl space encapsulation system comes with all the materials and equipment required to completely encapsulate your crawl space. The vapor barrier material, sealant, tape, and other materials could fall under this category.
- Tools: A tape measure, scissors, a utility knife, and a stapler or staples are among the additional items you will need to install the vapor barrier. If your crawl area is difficult to enter, a ladder can also be necessary.
Cost of Vapor Barrier Installation
The size of your crawl space, the kind of vapor barrier material you select, and the intricacy of the installation will all affect how much it will cost to install one in your North Charleston, South Carolina house.
Before choosing a contractor for the task, it is advised to obtain bids from a number of them, check out their references, and learn more about them. Remember that vapor barrier installation costs can vary widely, so it's crucial to shop around and do your research to obtain the best deal for your job.
When planning your budget for your vapor barrier installation, remember to include the cost of materials in addition to the cost of labor.
Common Mistakes to Avoid During Installation
When putting in a crawl space vapor barrier in their North Charleston, South Carolina house, homeowners can make a number of blunders that should be avoided.
- Using the wrong type of vapor barrier material: It's critical to select a vapor barrier material made especially for usage in crawl spaces. The vapor barrier may prematurely break if the incorrect material is used, such as a thinner or less resilient plastic sheet.
- Not sealing the edges of the vapor barrier: A crawl space vapor barrier needs to be correctly sealed to the crawl space walls in order to function. Inadequate sealing of the vapor barrier's borders can leave gaps or holes that can let moisture and water vapor through.
- Not overlapping the vapor barrier: When building the vapor barrier, it's crucial to overlap the edges in order to make a continuous, seamless barrier. If the edges are not overlapped, the vapor barrier may develop gaps or holes that reduce its effectiveness.
- Not properly sealing the seams of the vapor barrier: To make a continuous, waterproof barrier, any seams in the vapor barrier should be thoroughly sealed using crawl space tape or a sealant. If the seams are not properly sealed, moisture and water vapor may enter, reducing the vapor barrier's efficiency.
- Skipping the preparation step: To ensure a smooth and successful installation of the vapor barrier, the crawl space surface must be properly prepared before preparation. This entails clearing the crawl space of any debris or other obstructions.
Tips for Maintaining a Vapor Barrier
Here are some guidelines for keeping your crawl space vapor barrier so that it keeps protecting your North Charleston, South Carolina house and continuing to work efficiently:
- Inspect the vapor barrier regularly: You should regularly check the vapor barrier in your crawl area for any signs of wear or damage. Examine the vapor barrier for any rips, holes, or places where it is not properly adhered to the crawl space walls.
- Repair any damages promptly: Repairing your vapor barrier as soon as you can is crucial if you discover any damage. While severe damages may necessitate replacing the damaged portion of the vapor barrier, smaller holes or tears can be patched with crawl space tape or a sealant.
- Keep the crawl space clean and dry: To avoid moisture and water vapor buildup and potential vapor barrier damage, the crawl space must be kept dry and clean. This can entail clearing out any waste or clutter that may be there, as well as getting rid of any standing water that may build up in the crawl space.
- Monitor the humidity levels in the crawl space: Mold and mildew growth brought on by excessive humidity in the crawl space can harm the vapor barrier and reduce its efficiency. Utilizing a humidity meter to keep an eye on the humidity levels in the crawl space and, if necessary, taking action to lower the humidity, is a smart idea.
- Consider adding additional insulation: Your home's energy efficiency can be further increased by adding more insulation, which will also shield the vapor barrier from temperature changes. This may be especially useful during severe weather.
You can make sure that your crawl space vapor barrier keeps working properly and is in good condition by following these recommendations.
Facts About Vapor Barriers
- Vapor barriers are employed to stop moisture from penetrating a crawl area and harming a house's structure.
- The floor of the crawl space is often covered with thick plastic sheeting, which is used to provide vapor barriers.
- To establish a continuous barrier, the plastic sheeting is taped or sealed to the walls and floor.
- To ensure that the plastic sheeting is sturdy enough to tolerate moisture and humidity, it should be put with a minimum 6 mil thickness.
- The plastic sheeting should be put in place in such a way that it prevents moisture from getting in while still allowing air to move through the crawl area.
- To ensure a tight seal, the plastic sheeting should be put with at least 6 inches of overlap.
- Water should be able to drain away from the house through the plastic sheeting installation.
- To make sure they are in good shape and are not leaking, vapor barriers should undergo routine inspections.
Frequently Asked Questions
How many access points does the crawl space have?
The size and design of the home might affect how many entry points there are to a crawl area. One or more access points to a crawl space may be found in various locations around the house. The following are a few typical places for crawl space access points:
- Inside the home: Crawl spaces may have entryways inside the house, as in a utility room or closet. These access points might be concealed by a detachable panel or reachable by a floor hatch.
- Outside the home: Access points to crawl spaces may also be found outside the house, such as a hatch or door on the exterior of the foundation.
- Under the home: Some crawl spaces could include entrances beneath the house, such a foundation hatch or door.
For purposes of upkeep and repair, access to the crawl space is crucial. Access points must be kept clean of any debris or obstructions and securely sealed to keep moisture and water vapor from entering the crawl space. If you are unable to identify the entrances to your crawl space, you might want to seek advice from a qualified contractor.
Is there evidence of water infiltration or moisture problems?
There are a number of indicators that could point to moisture issues or water intrusion in a crawl space, including:
- Standing water: You may have water infiltration or inadequate drainage if there is standing water in your crawl area.
- Visible mold or mildew: If there is mold or mildew in the crawl space, there may be too much moisture and humidity present.
- Musty or damp odors: The presence of moisture or water intrusion in the crawl area may be indicated by a musty or damp smell.
- Water stains or discoloration: Water penetration or moisture issues may be indicated by water stains or discoloration on the walls or floor of the crawl space.
- Warped or rotting wood: The crawl space's warped or rotting wood may be a sign of excessive moisture or water intrusion.
In order to stop further harm to your property, it is crucial to treat the issue as soon as you suspect there may be moisture issues or water infiltration in your crawl space. A qualified contractor can evaluate the condition of your crawl space and make recommendations for any improvements or repairs that are required.
Where is the vapor barrier located?
The normal location of a crawl space vapor barrier is on the floor of the crawl space. It is a material layer, typically a thick plastic sheet, used to stop moisture and water vapor from penetrating the crawl space's walls, floors, and ceilings. The vapor barrier is normally put in place on top of the ground, covering the crawl space's whole floor. In order to effectively stop moisture and water vapor from entering the crawl space, it is crucial to make sure the vapor barrier is placed and sealed properly.
Where do you need to install the vapor barrier?
The entire crawl space ground surface must be covered in order to install a vapor barrier in the crawl space correctly. This means that the entire crawl space floor should be covered with the vapor barrier, which should be built on top of the ground. As gaps and holes can let moisture and water vapor through, it is crucial to make sure the vapor barrier is correctly sealed and overlapped to avoid any. To make a continuous, watertight barrier, it's crucial to seal the vapor barrier's edges to the crawl space walls.
What are the costs associated with the installation?
The size of your crawl space, the kind of vapor barrier material you select, and the difficulty of the installation are some of the variables that will affect the cost of constructing a crawl space vapor barrier. When planning your budget for your vapor barrier installation, remember to include the cost of materials in addition to the cost of labor. Obtaining estimates from multiple different contractors will help you find the project's best price. In order to make sure you are getting a high-quality installation, it is also a good idea to ask for references and research the reputation of the professionals you are thinking about hiring.
Contact EAS Environmental Today!
EAS Environmental will do everything we can to ensure your experience with us is excellent.
Request A FREE Estimate
Request a Free Estimate Form
Checkout Recent Post

Got a Question? We’re Here to Help.
You can arrange an appointment or make an enquiry by phone or email, orget in touch to us via our contact form.
