The Step-by-Step Process of Water Damage Restoration
Sean Flynn • May 10, 2024

Water is the giver of life, yet when it enters our homes in uncontrollable quantities, it can become a destructive force. From leaky faucets to full-blown floods, dealing with water damage can be overwhelming. However, understanding the process of water damage restoration can not only help you manage the situation effectively but also prepare you for what to expect when working with professionals.

This comprehensive guide will walk you through the intricate steps involved in water damage restoration, from initial assessment to the final touches. Whether you're a homeowner in the midst of a water crisis or a professional looking to refine your skills, this article demystifies the restoration process, offering you deep insights and expert tips.

Step 1: Emergency Contact and Inspection

The first step in water damage restoration is to act swiftly. Whether it's the dead of night or the peak of a weekday, water damage does not abide by a schedule, and immediate action can make all the difference in mitigating the long-term effects. After you've discovered the water intrusion, the emergency contact for a water damage restoration company should be your first call.

Upon arrival, a team of professionals will conduct an extensive inspection of your property, identifying the source of the water and categorizing the type of water damage to determine the appropriate response. They will assess the extent of the damage to your structure and belongings to provide a clear plan of action and cost estimate for the restoration process.

Step 2: Water Extraction

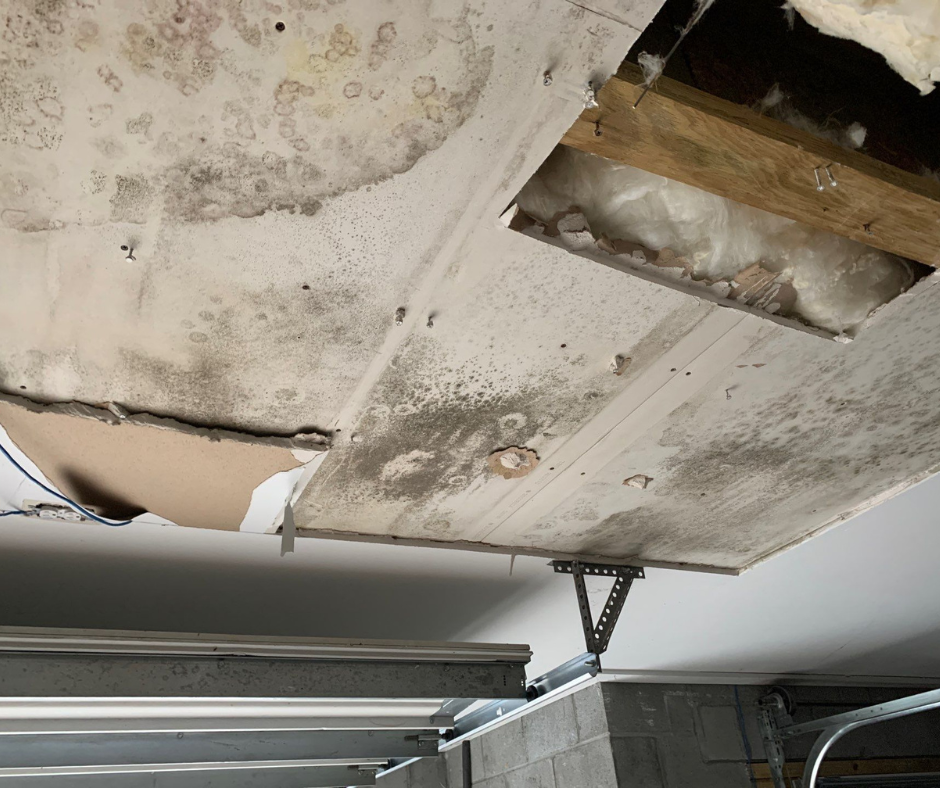
Once the inspection is complete, the next critical step is water extraction. High-powered pumps and vacuums are used to remove hundreds or even thousands of gallons of water from your property. This step is crucial in preventing mold growth, as standing water can quickly become a breeding ground for harmful microorganisms.

If the water intrusion is severe, the removal process may be continuous for an extended period until all visible water is extracted, followed by strategic placement of drying equipment to address unseen moisture that may have infiltrated porous materials.

Step 3: Drying and Dehumidification

After bulk water is removed, the focus shifts to drying and dehumidification. The restoration professionals will begin by taking humidity readings to determine the moisture levels in the air and materials. Industrial-strength air movers and dehumidifiers will be positioned to circulate the air and hasten the evaporation of water from surfaces and within materials.

This phase can be the most prolonged, as thorough drying is vital to prevent structural damage and mold growth. Monitoring equipment is used to regularly check moisture levels until the property is deemed dry.

Step 4: Cleaning and Sanitizing

Water damage often comes with the added burden of contaminants and odors. After the affected areas are completely dry, the restoration team will begin the process of cleaning and sanitizing your property. Non-porous materials can usually be restored, while porous materials may need to be replaced to prevent the spread of contaminants and ensure the health and safety of the inhabitants.

Specialized cleaning techniques and antimicrobial treatments are used for salvageable materials to remove odors and protect against mold and microbial growth. Cleaning also includes not just the structures, but all salvageable contents affected by the water damage, such as furniture, curtains, and personal items.

Step 5: Restoration

Once the cleaning and sanitization process is complete, the final step is restoration. This may involve minor repairs, such as replacing drywall, painting, or installing new carpet, or major reconstruction, such as rebuilding entire rooms of your home. The objective is to return the property to its pre-damaged condition.

Restoration can be a lengthy process, especially in cases of extensive damage, but it is crucial to take the time necessary to ensure the work is done properly, and your home is safe and habitable once again.

Additional Considerations in Water Damage Restoration

Insurance and Documentation

Dealing with water damage is not just a matter of physical restoration; it's also a financial and legal process. It's vital to understand your insurance coverage and to document the damage thoroughly with photos and detailed descriptions before any cleaning or restoration work begins. Clear documentation will strengthen your insurance claim and help ensure you receive the compensation you're entitled to.

Health and Safety

Throughout the restoration process, health and safety should be top priorities. Standing water can contain harmful pathogens, and improper handling can lead to serious health risks. It's essential to adhere to safety protocols, such as wearing protective gear and using proper ventilation, to avoid illness or injury.

Professionalism and Certification

Selecting a reputable water damage restoration company is a critical decision. Look for professionals who are certified by industry organizations, such as the Institute of Inspection, Cleaning and Restoration Certification (IICRC). Certification ensures that the restoration company adheres to the highest standards and best practices in the field.

Prevention and Aftercare

Water damage can often be mitigated with preventative measures. After restoration, consider implementing safeguards such as sump pumps, backflow preventers, or regular maintenance checks to avoid future water-related disasters.

Understanding the water damage restoration process empowers you to take swift, informed action in an emergency. Whether you're a homeowner or a professional, the knowledge gained from this guide equips you to handle water damage with confidence and effectiveness. Remember, when water damage strikes, time is of the essence, and a well-executed restoration effort can save you time, money, and the headaches of long-term damage.

Contact EAS Environmental Today!

EAS Environmental will do everything we can to ensure your experience with us is excellent.

CALL US NOW

Request A FREE Estimate

Request a Free Estimate Form

Checkout Recent Post

By Spencer Turner July 10, 2025
Asbestos was once hailed as a “miracle material” for its heat resistance, durability, and insulating capabilities. For decades, it was widely used in residential construction—especially in insulation, floor tiles, roofing materials, and textured ceilings. However, growing awareness of its severe health risks prompted a series of regulatory crackdowns. So, when was asbestos banned in homes? The answer isn’t straightforward—but knowing the history is essential for homeowners, renovators, and anyone living in a home built before 1990. Asbestos Use in Residential Construction: A Historical Overview Asbestos use in homes peaked between the 1930s and the 1970s. It was commonly found in: Insulation (especially around pipes and ducts) Vinyl (VCT) floor tiles and adhesives (mastic) Roofing shingles and flashing Cement siding (“transite”) Acoustic ceiling tiles Popcorn ceiling texture Joint compounds - like those found in typical drywall Cement products Although concerns about asbestos exposure surfaced as early as the 1960s, it wasn't until the late 1970s and 1980s that its use began to be seriously curtailed - but not eliminated. When Was Asbestos Banned? Contrary to popular belief, asbestos has not been fully banned in the United States. Instead, its use has been heavily restricted through a series of phased regulations: 1973: The EPA banned spray-applied asbestos-containing materials for fireproofing and insulation. 1977: The Consumer Product Safety Commission banned asbestos in wall patching compounds and artificial fireplace embers. 1989: The EPA issued a full ban under the Asbestos Ban and Phase-Out Rule—but it was largely overturned in 1991. Present Day: Many asbestos-containing materials are no longer manufactured or sold, but asbestos remains legal in certain products under strict regulation. Because of this phased and partial ban, asbestos-containing materials can still be found in homes built as late as the 1980s—and even later in some imported materials. How Do I Know If My Home Contains Asbestos? If your home was built before the mid-1980s, there's a high chance it may contain asbestos. However, asbestos is not dangerous unless it is disturbed and becomes airborne. Common risk scenarios include: Renovation or demolition of older homes Damage to aging building material DIY repairs involving insulation or flooring Professional asbestos inspection and testing are the only reliable ways to confirm its presence. Where Can Asbestos Still Be Found in Homes? Even homes built into the 1980s or early 1990s may contain asbestos. It’s often present in: Popcorn/textured ceilings Vinyl tiles and mastic adhesives Duct and pipe insulation Roofing and siding materials Joint compound used in drywall taping What EAS Environmental Can Do to Help At EAS Environmental, our certified professionals specialize in: Asbestos inspections and risk assessments Sample collection and laboratory testing Safe asbestos abatement and removal Post-removal air quality verification We adhere strictly to federal and state guidelines, ensuring that any asbestos-containing materials are handled safely and effectively. Don’t Take the Risk—Test Before You Renovate Whether you’re planning a renovation or simply want peace of mind, understanding your home's asbestos risk is crucial. Ignoring potential exposure can lead to serious health issues like mesothelioma, lung cancer, and asbestosis. Contact EAS Environmental today to schedule a professional inspection and safeguard your property and your health. FAQ – Common Asbestos Questions Q: Is asbestos still used today? A: Yes. Some imported products may legally contain asbestos (e.g., brake pads, roofing, gaskets). Q: Can I test for asbestos myself? A: DIY kits are available but unreliable. Disturbing the material could create a health risk. It is best to consult with a certified professional. Q: What’s the safest way to remove asbestos? A: Consult with licensed abatement specialists who follow EPA and OSHA standards. Q. Can I find asbestos on new homes? A: Yes. Some newer homes may still contain asbestos in imported materials, leftover stock, or legal non-friable products like certain floor tiles or roofing materials. References 1. U.S. Environmental Protection Agency (EPA) Asbestos Laws and Regulations: https://www.epa.gov/asbestos/asbestos-laws-and-regulations 2. Occupational Safety and Health Administration (OSHA) Asbestos Fact Sheet: https://www.osha.gov/sites/default/files/publications/OSHA3507.pdf 3. Consumer Product Safety Commission (CPSC) Banned Hazardous Products: https://www.cpsc.gov/Business--Manufacturing/Business-Education/Business-Guidance/Banned-Hazardous-Products 4. Agency for Toxic Substances and Disease Registry (ATSDR) Asbestos Toxicological Profile: https://wwwn.cdc.gov/TSP/ToxProfiles/ToxProfiles.aspx?id=30&tid=4 5. National Cancer Institute (NCI) – NIH Asbestos Exposure and Cancer Risk: https://www.cancer.gov/about-cancer/causes-prevention/risk/substances/asbestos/asbestos-fact-sheet 6. Environmental Working Group (EWG) Asbestos Nation Report: https://www.ewg.org/asbestos/
By Spencer Turner June 26, 2025
In the restoration industry, your name is everything. Reputation, reliability, and results drive your success — and that’s exactly why restoration companies across South Carolina choose EAS Environmental as their trusted subcontractor. We understand the pressure restoration firms face: tight timelines, unpredictable scopes, complex compliance standards, and demanding client expectations. When you need a partner who enhances — not hinders — EAS delivers quietly, powerfully, and professionally.
By Spencer Turner April 8, 2025
The EAS Environmental Team Our core values are fundamental to our operation and integral to our identity at EAS Environmental (EASE). These principles guide our actions, influence our decisions, shape our culture, and ensure that we consistently deliver outstanding services while maintaining a supportive and dynamic work environment. As we gathered insights from our employees about how these values play out in their work lives, it became evident how integral they are to both our individual and collective successes.
By Spencer Turner March 5, 2025
Mold: it’s more than just an unsightly blotch on your walls—it’s a sneaky intruder that can compromise your health and home integrity before you even realize it’s there. At EAS Environmental, we deal with this hidden hazard head-on, combining expertise and empathy to restore safety and comfort to your spaces. Today, we'll dive into the nitty-gritty of mold—what it is, where it lurks, and why it’s a problem—plus, we'll share how our team ensures your environment remains healthy and wholesome.
SEE MORE

Got a Question? We’re Here to Help.

You can arrange an appointment or make an enquiry by phone or email, orget in touch to us via our contact form.

CONTACT US TODAY